
本博客日IP超过2000,PV 3000 左右,急需赞助商。
极客时间所有课程通过我的二维码购买后返现24元微信红包,请加博主新的微信号:xttblog2,之前的微信号好友位已满,备注:返现
受密码保护的文章请关注“业余草”公众号,回复关键字“0”获得密码
所有面试题(java、前端、数据库、springboot等)一网打尽,请关注文末小程序

【腾讯云】1核2G5M轻量应用服务器50元首年,高性价比,助您轻松上云
我们经常需要在容器启动的时候做一些钩子动作,比如注册消息消费者,监听配置等,今天就总结下SpringBoot留给开发者的 7 个启动扩展点。
容器刷新完成扩展点
通过监听容器刷新完成扩展点ApplicationListener<ContextRefreshedEvent>。
基本用法
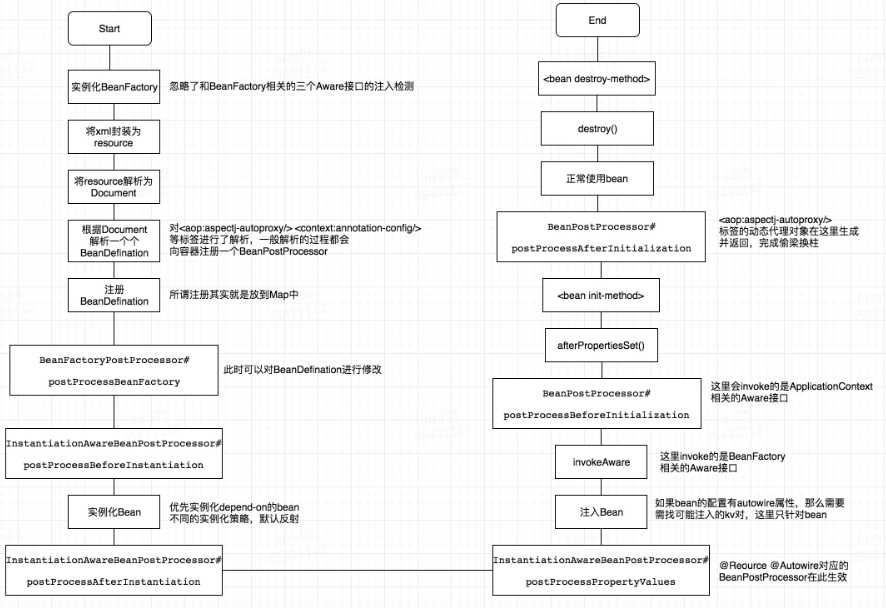
熟悉Spring的同学一定知道,容器刷新成功意味着所有的Bean初始化已经完成,当容器刷新之后Spring将会调用容器内所有实现了ApplicationListener<ContextRefreshedEvent>的Bean的onApplicationEvent方法,应用程序可以以此达到监听容器初始化完成事件的目的。
@Component
public class StartupApplicationListenerExample implements
  ApplicationListener<ContextRefreshedEvent> {

    private static final Logger LOG
      = Logger.getLogger(StartupApplicationListenerExample.class);

    public static int counter;

    @Override public void onApplicationEvent(ContextRefreshedEvent event) {
        LOG.info("Increment counter");
        counter++;
    }
}
易错的点
这个扩展点用在web容器中的时候需要额外注意,在web 项目中(例如spring mvc),系统会存在两个容器,一个是root application context,另一个就是我们自己的context(作为root application context的子容器)。如果按照上面这种写法,就会造成onApplicationEvent方法被执行两次。解决此问题的方法如下:
@Component
public class StartupApplicationListenerExample implements
  ApplicationListener<ContextRefreshedEvent> {

    private static final Logger LOG
      = Logger.getLogger(StartupApplicationListenerExample.class);

    public static int counter;

    @Override public void onApplicationEvent(ContextRefreshedEvent event) {
        if (event.getApplicationContext().getParent() == null) {
            // root application context 没有parent
            LOG.info("Increment counter");
            counter++;
        }
    }
}
高阶玩法
当然这个扩展还可以有更高阶的玩法:「自定义事件」,可以借助Spring以最小成本实现一个观察者模式:
- 先自定义一个事件:
public class NotifyEvent extends ApplicationEvent {
    private String email;
    private String content;
    public NotifyEvent(Object source) {
        super(source);
    }
    public NotifyEvent(Object source, String email, String content) {
        super(source);
        this.email = email;
        this.content = content;
    }
    // 省略getter/setter方法
}- 注册一个事件监听器
@Component
public class NotifyListener implements ApplicationListener<NotifyEvent> {

    @Override
    public void onApplicationEvent(NotifyEvent event) {
        // 公众号:业余草
        System.out.println("邮件地址:" + event.getEmail());
        System.out.println("邮件内容:" + event.getContent());
    }
}- 发布事件
@RunWith(SpringRunner.class)
@SpringBootTest
public class ListenerTest {
    @Autowired
    private WebApplicationContext webApplicationContext;

    @Test
    public void testListener() {
        NotifyEvent event = new NotifyEvent("object", "abc@qq.com", "This is the content");
        webApplicationContext.publishEvent(event);
    }
}- 执行单元测试可以看到邮件的地址和内容都被打印出来了
SpringBoot的CommandLineRunner接口
当容器上下文初始化完成之后,SpringBoot也会调用所有实现了CommandLineRunner接口的run方法,下面这段代码可起到和上文同样的作用:
@Component
public class CommandLineAppStartupRunner implements CommandLineRunner {
    private static final Logger LOG =
      LoggerFactory.getLogger(CommandLineAppStartupRunner.class);

    public static int counter;

    @Override
    public void run(String...args) throws Exception {
        LOG.info("Increment counter");
        counter++;
    }
}
对于这个扩展点的使用有额外两点需要注意:
- 多个实现了
CommandLineRunner的Bean的执行顺序可以根据Bean上的@Order注解调整 - 其
run方法可以接受从控制台输入的参数,跟ApplicationListener<ContextRefreshedEvent>这种扩展相比,更加灵活
// 从控制台输入参数示例
java -jar CommandLineAppStartupRunner.jar abc abcdSpringBoot的ApplicationRunner接口
这个扩展和SpringBoot的CommandLineRunner接口的扩展类似,只不过接受的参数是一个ApplicationArguments类,对控制台输入的参数提供了更好的封装,以--开头的被视为带选项的参数,否则是普通的参数
@Component
public class AppStartupRunner implements ApplicationRunner {
    private static final Logger LOG =
      LoggerFactory.getLogger(AppStartupRunner.class);

    public static int counter;

    @Override
    public void run(ApplicationArguments args) throws Exception {
        LOG.info("Application started with option names : {}",
          args.getOptionNames());
        LOG.info("Increment counter");
        counter++;
    }
}
比如:
java -jar CommandLineAppStartupRunner.jar abc abcd --autho=mark verboseBean初始化完成扩展点
前面的内容总结了针对容器初始化的扩展点,在有些场景,比如监听消息的时候,我们希望Bean初始化完成之后立刻注册监听器,而不是等到整个容器刷新完成,Spring针对这种场景同样留足了扩展点:
@PostConstruct注解
@PostConstruct注解一般放在Bean的方法上,被@PostConstruct修饰的方法会在Bean初始化后马上调用:
@Component
public class PostConstructExampleBean {

    private static final Logger LOG
      = Logger.getLogger(PostConstructExampleBean.class);

    @Autowired
    private Environment environment;

    @PostConstruct
    public void init() {
        LOG.info(Arrays.asList(environment.getDefaultProfiles()));
    }
}InitializingBean接口
InitializingBean的用法基本上与@PostConstruct一致,只不过相应的Bean需要实现afterPropertiesSet方法
@Component
public class InitializingBeanExampleBean implements InitializingBean {

    private static final Logger LOG
      = Logger.getLogger(InitializingBeanExampleBean.class);

    @Autowired
    private Environment environment;

    @Override
    public void afterPropertiesSet() throws Exception {
        LOG.info(Arrays.asList(environment.getDefaultProfiles()));
    }
}@Bean注解的初始化方法
通过@Bean注入Bean的时候可以指定初始化方法:**Bean的定义**
public class InitMethodExampleBean {

    private static final Logger LOG = Logger.getLogger(InitMethodExampleBean.class);

    @Autowired
    private Environment environment;

    public void init() {
        LOG.info(Arrays.asList(environment.getDefaultProfiles()));
    }
}「Bean注入」
@Bean(initMethod="init")
public InitMethodExampleBean initMethodExampleBean() {
    return new InitMethodExampleBean();
}
通过构造函数注入
Spring也支持通过构造函数注入,我们可以把搞事情的代码写在构造函数中,同样能达到目的
@Component
public class LogicInConstructorExampleBean {

    private static final Logger LOG
      = Logger.getLogger(LogicInConstructorExampleBean.class);

    private final Environment environment;

    @Autowired
    public LogicInConstructorExampleBean(Environment environment) {
        this.environment = environment;
        LOG.info(Arrays.asList(environment.getDefaultProfiles()));
    }
}Bean初始化完成扩展点执行顺序?
可以用一个简单的测试:
@Component
@Scope(value = "prototype")
public class AllStrategiesExampleBean implements InitializingBean {

    private static final Logger LOG
      = Logger.getLogger(AllStrategiesExampleBean.class);

    public AllStrategiesExampleBean() {
        LOG.info("业余草" + "Constructor");
    }

    @Override
    public void afterPropertiesSet() throws Exception {
        LOG.info("InitializingBean");
    }

    @PostConstruct
    public void postConstruct() {
        LOG.info("PostConstruct");
    }

    public void init() {
        LOG.info("init-method");
    }
}实例化这个Bean后输出:
[main] INFO o.b.startup.AllStrategiesExampleBean - Constructor
[main] INFO o.b.startup.AllStrategiesExampleBean - PostConstruct
[main] INFO o.b.startup.AllStrategiesExampleBean - InitializingBean
[main] INFO o.b.startup.AllStrategiesExampleBean - init-method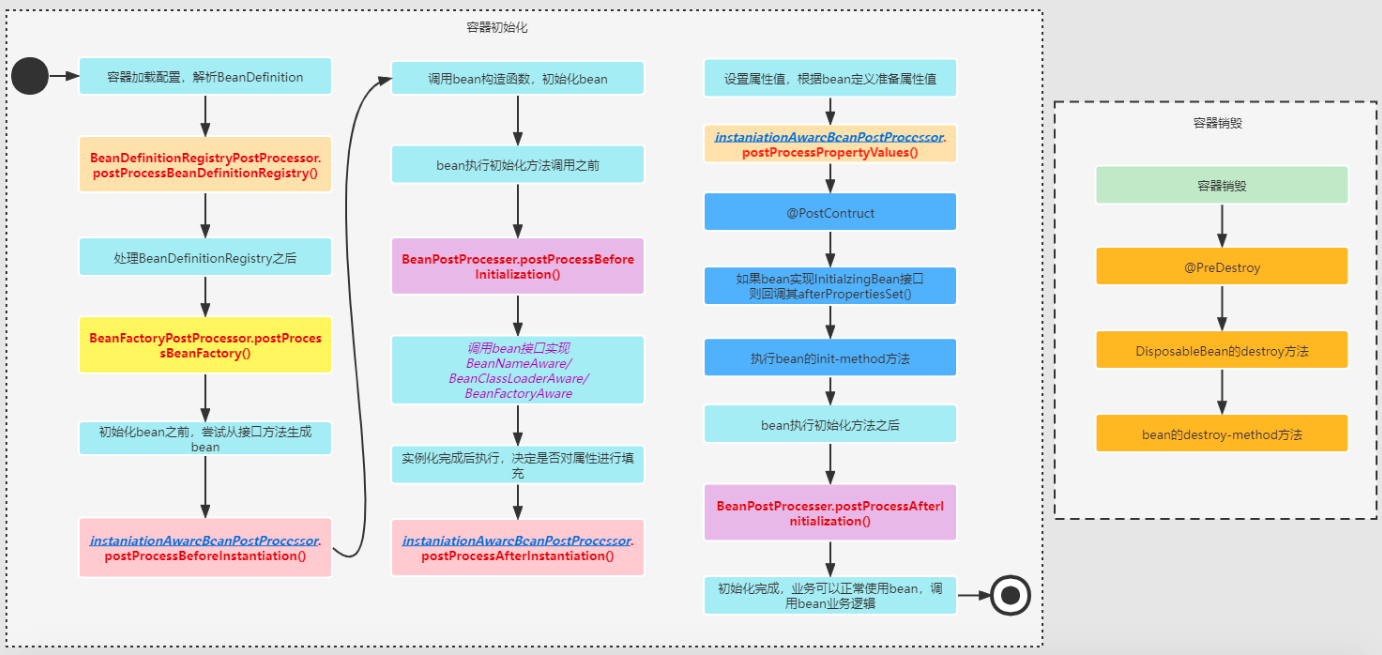
总结的以上内容,建议大家收藏。平时业务开发过程中,时不时的会用到。

最后,欢迎关注我的个人微信公众号:业余草(yyucao)!可加作者微信号:xttblog2。备注:“1”,添加博主微信拉你进微信群。备注错误不会同意好友申请。再次感谢您的关注!后续有精彩内容会第一时间发给您!原创文章投稿请发送至532009913@qq.com邮箱。商务合作也可添加作者微信进行联系!
本文原文出处:业余草: » SpringBoot在初始化前后的7种扩展点!